SAFe® in Azure DevOps - The Process
- Jun 10, 2022
- 4 min read
Updated: Jun 14, 2022
We're going to start this series by creating the Process in Azure DevOps (ADO). Here we'll build out the backlog hierarchy. Later we'll build Iteration Paths, Area Paths, and then the Teams and finally the ART and a way to manage Risks and Objectives. The Process in ADO is where Work Item Types like Epic, Feature, User Story, etc. are configured.

Microsoft's documentation is solid, so let's jump past getting an account and setting up your organization and creating your first project. In ADO terms, a project is just a place to store work, even if there's no "project" in the PMI sense of the word.
The Project and Process

One of the first things you want to do is set the Process. This is the place in ADO where you establish the different work item types, their states, and the hierarchy of the backlogs. Processes are centrally designed and assigned in ADO. The good of this is that it simplifies standardization across the organization when appropriate. To get to the Process, start at the main page and then select Organization Settings.

From there select Boards / Process

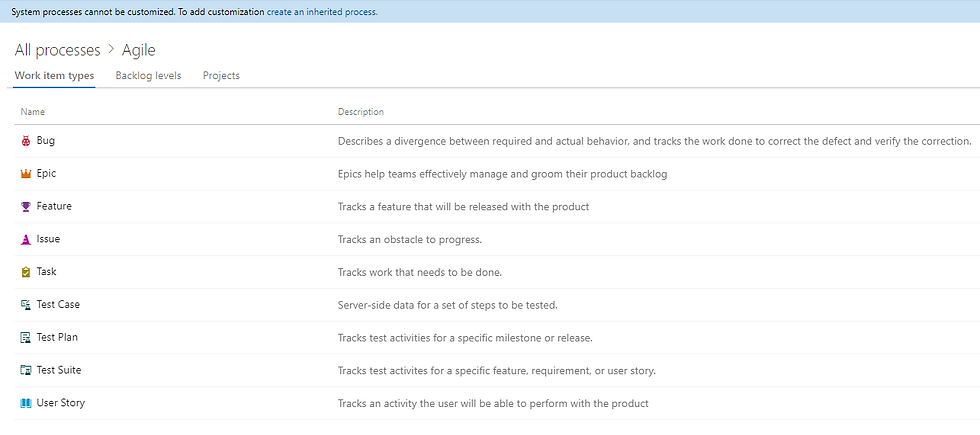
By default there are a few Processes already defined, and the terms didn't exactly match my expectations.

But the one called Agile looks a lot like SAFe. By default it has Epics, Features, and Stories along with Bugs, Issues, and Tasks. This is a pretty good start.
Creating a Custom Process
Read that note at the top - if you want to modify the Process in any way then you'll want to create your own Process. Let's do that for reasons that won't be obvious until much later.

Work Item Types
Let's go ahead and create a few work item types that SAFe hints at but doesn't explicitly mandate: Portfolio Epics, Enabler Features, and Research Spikes. These are obviously optional, and you may need your own types of work items. Remember that SAFe is a framework, so it's perfectly appropriate to build your own set of work item types.

Don't forget to set a meaningful icon and color. For some reason, ADO decided to generate a blank page and spin after that dialog box, but clicking on the Process name at the top of the page showed me the correct list.

Clicking on the Work Item Type name (Portfolio Epic) enables editing the Layout, State, and Rules. For now let's just have the Portfolio Epic match the SAFe Portfolio Kanban states.

States
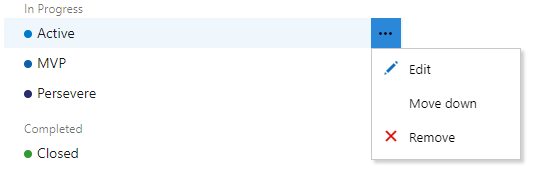
Clicking New State allows the creation of additional States beyond New, Active, and Closed.
Note: you can configure the States at any time. However, any time a Team and therefore Board is created the Kanban Board will be built so that it matches the States at the time of creation. So if you edit the States later then you'll need to edit each Kanban Board in the Project in order to reflect the new States.

When creating or editing a State, the new State must be mapped to a State Category. The State Categories cannot be edited, and there are some reports, dashboards, and metrics that are hardcoded to those underlying State Categories.

If you really want to match the Framework then you can remove States that don't match the article. Let's keep New as a pre-Funnel option but delete Active. We're also going to be smart enough to recognize that Closed and Done are close enough that there's no need to create one just to remove the other.

The process is the same for all Work Item Types. Here's the full list once created.

Tip - use the same States for all Work Item types at the same level. In this case that means Enabler Feature should have the same States as Feature and Research Spike should have the same as User Story. If you have a situation where a State doesn't apply, it's not a real problem to leave the State out, but it can lead to some behavior in the tool that's a little difficult to explain.
Backlog Levels
Now to set the Backlog levels.

A very nice feature in ADO is the ability to set custom Backlog levels and have multiple Work Item Types in each level. The Backlog levels page allows you to configure the levels. Note the new Work Item Types that we configured in the previous steps.

Clicking New top level portfolio backlog will allow you to create a new Backlog Level. In this case the default Work Item Type is Portfolio Epic because there's only one Work Item Type present. I had to call this level LPM (Lean Portfolio Management) because my instance already has a level called Portfolio.

By editing the Feature Level I can select Enabler Feature but keep Feature as the Default Work Item Type.

Here's the final configuration after adding Research Spike to the Requirement Backlog.

Adding the Process to the Project
Making your new Process the default is relatively simple. Click the 3 dots by the name and set it to Default. Now all new Projects will be created with this process. That part is intuitive. But changing the process is a little less straightforward. Go back to the list of Processes and select the Process that your Project is currently using.
Got that? Right.
So in this case go to Basic (default) and then select Projects


And now you can click the 3 dots to change the process


The warning is another reminder of why it's a good idea to set things up earlier rather than later. There's nothing wrong with iterative and incremental work, but once you know your Process, you want to propagate it as quickly as possible.

And that's it! Your Project is now using your new SAFe Process.


I appreciated how you pointed out that the default Agile process already matches SAFe's Epic-Feature-Story hierarchy. For managing video content alongside your backlog, converting subtitle formats like VTT to SRT can streamline your media workflows.
This post does a great job outlining how SAFe integrates within Azure DevOps and the flexibility it offers for large-scale agile transformations. It’s interesting to see how teams can manage their portfolios and align development efforts using built-in boards and backlogs. When comparing Azure DevOps vs Jira, it often comes down to enterprise needs Azure DevOps provides a more integrated CI/CD pipeline, while Jira shines with its customizable workflows and plugin ecosystem. Its reminds me of that semester when i realied on take my online philosophy class help service made it easier to focus on understanding tough concepts without feeling overwhelmed.
This post does a great job outlining how SAFe integrates within Azure DevOps and the flexibility it offers for large-scale agile transformations. It’s interesting to see how teams can manage their portfolios and align development efforts using built-in boards and backlogs. When comparing Azure DevOps vs Jira, it often comes down to enterprise needs—Azure DevOps provides a more integrated CI/CD pipeline, while Jira shines with its customizable workflows and plugin ecosystem.